Tuesday, December 16, 2008

Got Kombat?

Once upon a time me and my cousins were milling about the backyard eating grass and sniffing each other crotches when, for some reason, we started taking photos.

As usual, we eventually sought out props to photograph with. As usual, we ended up getting one of my huge fuck off knives, then a mattock, then a sword, and finally a chainsaw.

Afterward, I chose my 4 favourite shots and brought out the gimp (no, not that gimp, this gimp!). Then I wrote an incredibly sensitive and heart warming childrens story for each one.

Enjoy.

Weigh in and pre-match psych out


omg click to enlarge bitch


So my auntie came up to me and my 2 little cousins and was like "YO, one of y'all do the dishes!", and immediately me and my older little cousin put our thumbs to our foreheads.

My younger little cousin hates doing the dishes. In fact, he would rather die. Consequently, his face turned red as he bared his teeth and pulled out his knife.

His words blasted off his furiously flapping tongue, "You bitches think you can tell me what to do?!?! Huh?! Fuck that shit! Let mortal kombat begin!"

And so it began ....


Round one


omg click to enlarge bitch


Always eager to butcher my little cousin, I ran to the shed and searched for the most brutal looking garden implement I could find. The giant orange mattock in the corner looked brutal enough to castrate a dinosaur. Perfect.

We met each other in the yard. Looking him in the eye, I gave him one chance to back out, "You think you can come up here and take a piece of this? Huh? Ill tell you something. You're gonna die."

In reply he gave me detailed instructions on exactly how I should go about copulating with a pencil sharpener. It didn't sound pleasant. I took that as a "yes" and charged.

I came in hard and high, hoping to cleave his skull with one good blow and splatter his brains on the ground for my dog. At the last fraction of a second, he darted sideways, puncturing my side with several jackhammer-like stabs before jumping back.

He'd hit me! Unbelievable! Looking him in the eye, I cursed with language so colourful you'd swear we were back in the 70's.

He snorted like a horse and ran at me with intense blood lust. But I was ready. I slapped that bitch down so hard there were tears in his eyes. Then the fight began in earnest...

It raged....

and raged...

Until finally, dazed, I stumbled around in a barely conscious stupor.

Like lightening, his knife flashed as he sliced my eyeballs right out of their sockets. But before I could let loose a single curse, the knife flashed again and then he was stuffing my eye sockets with my own severed testicles.... FATALITY.


Round two


omg click to enlarge bitch


If you thought that watching me getting slaughtered would force my older younger cousin (Commando) to yield to my younger younger cousin (Killalot) then you have clearly underestimated how much we hate doing dishes.

Commando went in search of some elite weaponry and returned with a samurai sword. Seeing this, Killalot decided to upgrade his own kill gear. He went to his room, rummaged around under his bed and came back with his favourite chainsaw.

Seeking the psychological high ground, Commando taunted: "When im done mutilating your corpse, im gonna kidnap your cat and rape the shit outta him every night for the rest of his life." Killalot replied matter-of-factly, "Go ahead, he likes it rough."

Taken aback by this, Commando tried some more conventional material. He launched into a detailed exposition of exactly how he would use his sword to extract Sir Killalot's beating heart out of his body via his anus. He thought that the whole "ill rip your heart out and show it to you" angle would have Killalot wetting himself, but the details bored Killalot and he stopped listening after a couple of sentences.

Commando tried one last time, "Bitch! Im gonna mutilate your genitals, stir fry them, and feed them to---", but before he could finish, Killalot raised his chainsaw, snorted with more vigour than 10 wild stallions and charged.

To be concluded ...

Round two point five

omg click to enlarge bitch


The kombat began.

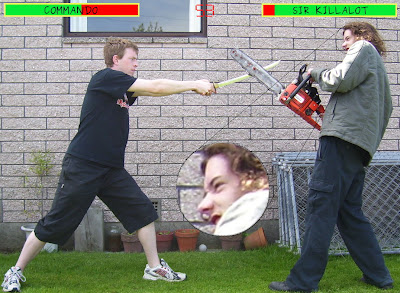
It was brutal. Really brutal. In fact, the brutality cannot be adequately described without resorting to alliterative testicle metaphors. It was ball breaking, sack splitting, gonad grinding, testy tearing, scrotum shattering, nad napalmingly brutal.

Commando's sword slashed. Deadly and swift with maximal finesse. Making razor cuts here and there but never striking a fatal blow.

Killalot, on the other hand, took the opposite approach. He flung his chainsaw around and around, roaring and biting, as though it were some psychotically fucked off lion he'd grabbed by the tail.

Their weapons crashed, bashed and smashed like the four drum kits of the apocalypse. Their snorting would have put rhinos to shame. Their facial expressions would have set churches on fire. Their foul cursing would have caused nuclear weapons to spontaneously detonate.

Eventually Sir Killalot won out and finished Commando off with The Voltron Maneuver, cutting him in half right down the middle.


Game Over.
Insert Coin.

....
Epilogue:


So me and my cousin were dead. But not for long. On account of our exceptional deeds, the Almighty saw fit to resurrect us into the afterlife immediately.

After we got settled in to hell, my other cousin employed the services of The Transdimensional Courier Agency to deliver the dishes down to us. We cleaned them and sent them back.

Wednesday, November 26, 2008

select count(*) as omg_wtf from postgres;

This morning I discovered something that made me want to jump up on my desk and drop the f-bomb in my office with heart and soul. It was as though I'd just been sucker punched by a circus midget then fisted by his exceptionally well trained elephant as I doubled over in pain.

Let me tell you a story.

Once upon a time this morning, I was trying to figure out why the fuck one of our servers had gone postal and exploded, leaving behind a stinking cloud of piss mist and gaseous fecal matter yet again.

Trawling through the logs of one of the web apps on the machine, I found a bunch of requests that had each taken 15 seconds to complete. After some investigation, I found that these requests were all doing a "select count(*) ..." from a table with millions of rows. OMG. So I fired up a postgres client and did an explain for the same query, and it told me it was doing a sequential fucking scan to find the count!

I googled intensely, and what I found made my jaw drop and my tongue roll out like a red carpet: There is no way to optimize count operations in postgresql. Read here for a brief explanation.

OMG thanks postgres! Mind if I rape you?!

Solutions

There are a bunch of work arounds you can find on google, but they all boil down to 2 approaches: cache the count, or guess the count.

So.....

Triggers anyone?!

 1 -- Create foos table
 2 CREATE TABLE foos (
 3   id   SERIAL PRIMARY KEY,
 4   name VARCHAR(255)
 5 );
 6
 7 -- Create table foos_count to hold a single row that contains the number of
 8 -- rows in the foos table
 9 CREATE TABLE foos_count (
10   counter  INTEGER
11 );
12 insert into foos_count values(0);
13
14 -- Increment count function
15 CREATE FUNCTION inc_foo_count() RETURNS trigger AS '
16 BEGIN
17 UPDATE foos_count SET counter = counter + 1;
18 RETURN NEW;
19 END;
20 ' LANGUAGE plpgsql;
21
22 -- add a trigger to increment foos_count.counter when inserting into foos
23 CREATE TRIGGER inc_foo_counter AFTER INSERT ON foos
24   EXECUTE PROCEDURE inc_foo_count();
25
26 -- Decrement count function
27 CREATE FUNCTION dec_foo_count() RETURNS trigger AS '
28 BEGIN
29 UPDATE foos_count SET counter = counter - 1;
30 RETURN NEW;
31 END;
32 ' LANGUAGE plpgsql;
33
34 -- add a trigger to decrement foos_count.counter when inserting into foos
35 CREATE TRIGGER dec_foo_counter AFTER DELETE ON foos
36   EXECUTE PROCEDURE dec_foo_count();

Oh yeah. Nothing like a good trigger to make you feel like you just got probed by a bunch of aliens with a fetish for egg beaters.


How about rules?

 1 -- Create foos table
 2 CREATE TABLE foos (
 3   id   SERIAL PRIMARY KEY,
 4   name VARCHAR(255)
 5 );
 6
 7 -- Create foos_count to hold a single row that contains the number of rows in
 8 -- the foos table
 9 CREATE TABLE foos_count (
10   counter  INTEGER
11 );
12 insert into foos_count values(0);
13
14 -- add a rule to increment foos_count.counter when inserting into foos
15 CREATE RULE inc_foo_count AS ON INSERT TO foos DO ALSO
16     UPDATE foos_count set counter = counter + 1;
17
18 -- add a rule to decrement foos_count.counter when inserting into foos
19 CREATE RULE dec_foo_count AS ON DELETE TO foos DO ALSO
20     UPDATE foos_count set counter = counter - 1;

Rules don't look all that bad— certainly much nicer than triggers.


You could also obtain an estimate of the count with this:
SELECT reltuples FROM pg_class WHERE oid = 'foos'::regclass::oid;

This will give you the count at the time of the last ANALYSE.

My lists

Ok, so lets take a look at what impact this experience has had on my lists.

Postgres just jumped from my Christmas List over to my Shit List — fuck you postgres, I'm gonna find you, and I'm gonna take my knife, and I'm gonna use your cock for a sheath.

The List Of Things I Should Have Known By Now grew by 1 for select count sucking the scrote.

The List Of Things I Should Have Played With By Now also grew by 1 for rules since this is the first time I've actively investigated them.

Friday, October 31, 2008

Vim pr0n: Statusline flags for bundy whitespace

Lately I've been working on some projects with indenting so screwed you could print the source code out and wank with it and not be able to tell the difference. It's as though the author couldn't decide whether to use tabs or spaces, so they flipped a coin every time they began a new source file, and evidently the coin landed on its fucking edge more often than not since there are a fair number of files that use both tabs and spaces.

I've also developed an extreme anti-fetish for trailing whitespace recently. I made vim highlight it, and that shit is fucking everywhere!

ZOMG

So, in a bid to eradicate both mixed indenting and trailing whitespace from the universe, I've made vim display some flags on my statusline whenever they are present, and whenever my &expandtab setting is wrong. Read this raving to find out how.

Note: this raving assumes a fair amount of knowledge about statuslines in vim. If you aren't pro at statuslines then you should read this raving first.

Just so you know what I mean...


A buffer containing mixed indenting, and trailing whitespace (click to enlarge).


A buffer with &et set wrong, and trailing whitespace (click to enlarge).


The three statusline flags of interest in the above screenshots are:

  • [mixed-indenting]: Appears when a buffer is indented with both tabs and spaces

  • [&et]: Appears when a buffer is indented consistently (i.e. using only spaces or only tabs) but the &expandtab setting for the buffer is wrong.

  • [\s]: Appears when a buffer contains trailing whitespace


The code for the [mixed-indenting] and [&et] flags


This is snipped straight outta my vimrc:
 1 "display a warning if &et is wrong, or we have mixed-indenting
 2 set statusline+=%#error#
 3 set statusline+=%{StatuslineTabWarning()}
 4 set statusline+=%*
 5
 6 "recalculate the tab warning flag when idle and after writing
 7 autocmd cursorhold,bufwritepost * unlet! b:statusline_tab_warning
 8
 9 "return '[&et]' if &et is set wrong
10 "return '[mixed-indenting]' if spaces and tabs are used to indent
11 "return an empty string if everything is fine
12 function! StatuslineTabWarning()
13     if !exists("b:statusline_tab_warning")
14         let tabs = search('^\t', 'nw') != 0
15         let spaces = search('^ ', 'nw') != 0
16
17         if tabs && spaces
18             let b:statusline_tab_warning =  '[mixed-indenting]'
19         elseif (spaces && !&et) || (tabs && &et)
20             let b:statusline_tab_warning = '[&et]'
21         else
22             let b:statusline_tab_warning = ''
23         endif
24     endif
25     return b:statusline_tab_warning
26 endfunction

There are three parts to this code. The function (lines 12–26) works out what should be displayed on the statusline and caches the result. An autocommand on line 7 clears this cache when the user is idle or saves the file. Lines 2–4 put the flag on the statusline.

Note that the caching is needed as the function is called every time the statusline is refreshed. Without caching this would be very costly since the function searches the entire buffer for a leading space and a leading tab.

The code for the [\s] flag


Also straight from my vimrc, this code functions very similarly to the previous code. Lines 8–17 calculate and cache what should be displayed on the statusline. Line 4 clears this cache when the user is idle, or saves the file. Line 1 puts the flag on the statusline.
 1 set statusline+=%{StatuslineTrailingSpaceWarning()}
 2
 3 "recalculate the trailing whitespace warning when idle, and after saving
 4 autocmd cursorhold,bufwritepost * unlet! b:statusline_trailing_space_warning
 5
 6 "return '[\s]' if trailing white space is detected
 7 "return '' otherwise
 8 function! StatuslineTrailingSpaceWarning()
 9     if !exists("b:statusline_trailing_space_warning")
10         if search('\s\+$', 'nw') != 0
11             let b:statusline_trailing_space_warning = '[\s]'
12         else
13             let b:statusline_trailing_space_warning = ''
14         endif
15     endif
16     return b:statusline_trailing_space_warning
17 endfunction

An aside: use the list and listchars settings!


I have these lines in my vimrc:

set list
set listchars=tab:▷⋅,trail:⋅,nbsp:⋅

This tells vim to display tab characters as little arrow things and trailing spaces as floating dots (as in the two screenshots at the top of this raving). Having tabs displayed is invaluable as it becomes obvious how a file is indented, and if you aren't following suit.

Join in the fight against bundy whitespace today!


I was eavesdropping on two catholic priests yesterday* when I overheard one of them talking about people who mix tabs and spaces, saying: "... I know for a fact that they will spend their eternities in hell licking flaming shit nuggets out of satans ass crack while he jacks off furiously, periodically ejaculating streams of molten lava in their faces!"

On the other hand, studies show that people who indent code responsibly are far more likely to have sex with famous actresses than those who don't.

So what are you waiting for? Take every precaution to ensure you indent correctly! And fuck trailing whitespace!


* may not be true.

Monday, October 27, 2008

Vim pr0n: conditional statusline highlighting

I have a fair amount of info on my statusline, and have often thought it would be nice if certain parts of it could be highlighted under certain conditions. For example, I have &fileencoding displayed, but I only really care about it if its not "utf-8". In that case I would like it to be highlighted using the "error" highlight group so that I'll be sure to notice it.

If you too have jacked off far into the night imagining how much fun you could have with conditionally highlighted statusline flags, then take off your pants, point the pork sword in a safe direction and read this raving immediately.

Note: this raving assumes a fair amount of knowledge about statuslines in vim. If you aren't pro at statuslines then you should read this raving first.

The desired result


In the bottom image, the statusline was set up to display &fileformat and &fileencoding using the "error" highlight if they were anything other than "unix" and "utf-8" respectively.

ZOMG how do you do it?!

Unfortunately there is no clean way to do it, but we can easily encapsulate the hacks in a couple of functions.

Here is the code that generated the statusline above:
 1 "Add the variable with the name a:varName to the statusline. Highlight it as
 2 "'error' unless its value is in a:goodValues (a comma separated string)
 3 function! AddStatuslineFlag(varName, goodValues)
 4   set statusline+=[
 5   set statusline+=%#error#
 6   exec "set statusline+=%{RenderStlFlag(".a:varName.",'".a:goodValues."',1)}"
 7   set statusline+=%*
 8   exec "set statusline+=%{RenderStlFlag(".a:varName.",'".a:goodValues."',0)}"
 9   set statusline+=]
10 endfunction
11
12 "returns a:value or ''
13 "
14 "a:goodValues is a comma separated string of values that shouldn't be
15 "highlighted with the error group
16 "
17 "a:error indicates whether the string that is returned will be highlighted as
18 "'error'
19 "
20 function! RenderStlFlag(value, goodValues, error)
21   let goodValues = split(a:goodValues, ',')
22   let good = index(goodValues, a:value) != -1
23   if (a:error && !good) || (!a:error && good)
24     return a:value
25   else
26     return ''
27   endif
28 endfunction
29
30 "statusline setup
31 set statusline=%t       "tail of the filename
32 call AddStatuslineFlag('&ff', 'unix')    "fileformat
33 call AddStatuslineFlag('&fenc', 'utf-8') "file encoding
34 set statusline+=%h      "help file flag
35 set statusline+=%m      "modified flag
36 set statusline+=%r      "read only flag
37 set statusline+=%y      "filetype
38 set statusline+=%{StatuslineCurrentHighlight()}
39 set statusline+=%=      "left/right separator
40 set statusline+=%c,     "cursor column
41 set statusline+=%l/%L   "cursor line/total lines
42 set statusline+=\ %P    "percent through file

This code does two things. First it defines two functions that implement conditionally highlighted statusline flags. Secondly, it sets up the statusline variable, making use of AddStatusLineFlag().

How does it work?

A function call like this:
call AddStatuslineFlag('&fenc', 'utf-8,latin1')

will cause the following to be added to the &statusline variable:
[%#error#%{RenderStlFlag(&fenc,'utf-8,latin1',1)}%*%{RenderStlFlag(&fenc,'utf-8,latin1',0)}]


If we break this down we have the following:

[
output a literal "[" char


%#error#
switch to the "error" highlight group


%{RenderStlFlag(&fenc,'utf-8,latin1',1)}
render &fenc only if it's not "utf-8" or "latin1".


%*
switch back to the normal statusline highlight group


%{RenderStlFlag(&fenc,'utf-8,latin1',0)}
render &fenc only if it is "utf-8" or "latin1".


]
output a literal "]" char.


The key thing is that &fenc will either be rendered inside the error highlight or (exclusive) just outside it.

Generalizing...

This exact code wont work for all cases, but we can derive some general guidelines.

If you want to highlight something (lets call it foobar) X different ways then:

  1. You must define a function to render foobar.

  2. You must call the function X times on your statusline, where each call must be highlighted one of the possible ways.

  3. The function must take an argument to specify which highlight group it is currently rendering for.

  4. At all times, all but one of the function calls must return an empty string, while the other call must return the value of foobar which will appear on the statusline.


Already solved in Vim 8

The problem of conditionally highlighting statusline flags has already been solved for Vim 8, as those of you who keep up with the various vim mailing lists will no doubt be aware of. If you havent heard, then check out this this sneak peek of the new feature.

Sunday, October 5, 2008

git add --patch gives me an erection

One of the reasons I tossed out my playboys and husslers in favour of the git man pages is git add --patch (or git add -p)

To say something like
git add -p is the fucking bomb, I wish it was a pony so I could ride it around the backyard and pet it and feed it straw all day long
would be the understatement of the new millenium.

If you use git and aren't familiar with git add -p, then take off your pants and read this raving immediately.

OMG wtf is it?!!?


git add --patch lets you cherry pick the changes you want to add to the index. This means you can make 10 changes to a file, then only add 5 of them to the next commit.

I dunno about you, but when I'm hacking the mainframe I can never seem to stick to one task. I always notice some bug, or some fucked up white space, or have to hack something else to get the current task done etc. Its nigh fucking impossible for me to keep the changes I make suitable for one atomic commit.

So I'm a bad boy. I don't care. Smack my ass and tell my parents. Just make sure you have breasts and a vagina if you do, or I'll bust your fucking chops. Hell, you can even skip the vagina if your breasts are exceptional, but don't try and tell me your working directory doesn't get tangled as fuck too.

How do you use it?


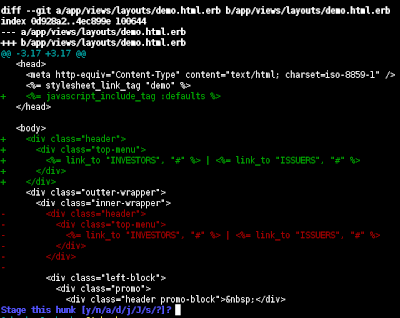
It's easy. Just go git add -p file1 file2 ... or just git add -p to work with all tracked files. This launches a program that will loop through all the changed hunks one by one asking you whether you want to stage them or not. It looks a lil sumthang like this:


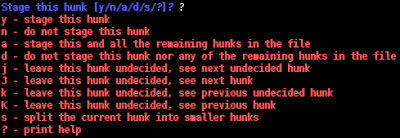
For every hunk, it prints out a diff and asks you what to do with it. You can hit ? to see the choices you have:


To quit just hit ctrl-c but be aware that the hunks you added will still be in the index.

Other useful tidbits


git add -p is actually a sub routine of the git add --interactive program. Sometimes it's faster to use git add --interactive (aka git add -i) to select which files you want git add -p to work with rather than entering them in on the command line.

Remember to do a git diff --cached to before you do the final git commit to make sure you didn't add anything extra by mistake.

If you do add something by mistake then use git reset HEAD path/to/file to remove the changes from the index.


Have a nice day.

Saturday, September 6, 2008

Vim pr0n: Creating named marks

A few days ago in #vim, someone asked if it is possible to create "named marks" with vim, i.e. marking a location with a name instead of a letter or number. The answer is no, but it was an interesting idea, so I turned down my pornography and wrote a script to do it.

When writing the code, I used prototype based OO — mainly to provide a more complex example for my previous raving.

Marks in vim


In vim you can mark a location in a file so you can quickly jump back there. A mark consists of a position (line/column) and an identifier (a single letter). Every buffer has its own set of lowercase marks (letters a–z) that exist only as long as the buffer exists. There is also a set of global marks using capital letters. These marks are persistent and there is only one set.

More info can be found at :help mark-motions.

Enter "named marks"


In the IRC chat, the guy wanted the same functionality as the uppercase marks, but with more descriptive names. Which is fair enough IMO since "A" doesn't really tell you anything about the position it jumps to.

So named marks are global, persistent marks with descriptive names.

The code


OMG check this out:

  1 "start the named mark prototype
  2 let s:NamedMark = {}
  3
  4 "the file the marks are stored in
  5 let s:NamedMark.Filename = expand('~/.namedMarks')
  6
  7 "constructor
  8 function! s:NamedMark.New(name, column, line, path)
  9   if a:name =~ ' '
 10     throw "IllegalNamedmarkNameError illegal name:" . a:name
 11   endif
 12
 13   let newNamedMark = copy(self)
 14   let newNamedMark.name = a:name
 15   let newNamedMark.column = a:column
 16   let newNamedMark.line = a:line
 17   let newNamedMark.path = a:path
 18   return newNamedMark
 19 endfunction
 20
 21 "lazy load and cache all named marks
 22 function! s:NamedMark.All()
 23   if !exists("s:NamedMark.AllMarks")
 24     let s:NamedMark.AllMarks = s:NamedMark.Read()
 25   endif
 26   return s:NamedMark.AllMarks
 27 endfunction
 28
 29 "create and add a new mark to the list
 30 function! s:NamedMark.Add(name, column, line, path)
 31
 32   try
 33     "if the mark already exists, just update it
 34     let mark = s:NamedMark.FindFor(a:name)
 35     let mark.column = a:column
 36     let mark.line = a:line
 37     let mark.path = a:path
 38
 39   catch /NamedMarkNotFoundError/
 40     let newMark = s:NamedMark.New(a:name, a:column, a:line, a:path)
 41     call add(s:NamedMark.All(), newMark)
 42
 43   finally
 44     call s:NamedMark.Write()
 45   endtry
 46 endfunction
 47
 48 "find the mark with the given name
 49 function! s:NamedMark.FindFor(name)
 50   for i in s:NamedMark.All()
 51     if i.name == a:name
 52       return i
 53     endif
 54   endfor
 55   throw "NamedMarkNotFoundError no mark found for name: \"".a:name.'"'
 56 endfunction
 57
 58 "get a list of all mark names
 59 function! s:NamedMark.Names()
 60   let names = []
 61   for i in s:NamedMark.All()
 62     call add(names, i.name)
 63   endfor
 64   return names
 65 endfunction
 66
 67 "delete this mark
 68 function! s:NamedMark.delete()
 69   call remove(s:NamedMark.All(), index(s:NamedMark.All(), self))
 70   call s:NamedMark.Write()
 71 endfunction
 72
 73 "go to this mark
 74 function! s:NamedMark.recall()
 75   exec "edit " . self.path
 76   call cursor(self.line, self.column)
 77 endfunction
 78
 79 "read the marks from the filesystem and return the list
 80 function! s:NamedMark.Read()
 81   let marks = []
 82   if filereadable(s:NamedMark.Filename)
 83     let lines = readfile(s:NamedMark.Filename)
 84     for i in lines
 85       let name   = substitute(i, '^\(.\{-}\) \d\{-} \d\{-} .*$', '\1', '')
 86       let column = substitute(i, '^.\{-} \(\d\{-}\) \d\{-} .*$', '\1', '')
 87       let line   = substitute(i, '^.\{-} \d\{-} \(\d\{-}\) .*$', '\1', '')
 88       let path   = substitute(i, '^.\{-} \d\{-} \d\{-} \(.*\)$', '\1', '')
 89
 90       let namedMark = s:NamedMark.New(name, column, line, path)
 91       call add(marks, namedMark)
 92     endfor
 93   endif
 94   return marks
 95 endfunction
 96
 97 "write all named marks to the filesystem
 98 function! s:NamedMark.Write()
 99   let lines = []
100   for i in s:NamedMark.All()
101     call add(lines, i.name .' '. i.column .' '. i.line .' '. i.path)
102   endfor
103   call writefile(lines, s:NamedMark.Filename)
104 endfunction
105
106 "NM command, adds a new named mark
107 command! -nargs=1
108   \ NM call s:NamedMark.Add('<args>', col("."), line("."), expand("%:p"))
109
110 "RM command, recalls a named mark
111 command! -nargs=1 -complete=customlist,s:CompleteNamedMarks
112   \ RM call s:NamedMark.FindFor('<args>').recall()
113
114 "DeleteNamedMark command
115 command! -nargs=1 -complete=customlist,s:CompleteNamedMarks
116   \ DeleteNamedMark call s:NamedMark.FindFor('<args>').delete()
117
118 "used by the above commands for cmd line completion
119 function! s:CompleteNamedMarks(A,L,P)
120   return filter(s:NamedMark.Names(), 'v:val =~ "^' . a:A . '"')
121 endfunction


lol, so... wtf does that do?


From a users perspective, if you were to shove this code in your vimrc, or in a plugin, it would provide three commands:

  • NM: create a new named mark, e.g. :NM main-function would create the main-function mark and bind it to the current file and cursor position. If that mark already existed, it would be overwritten

  • RM: recall a previous mark, e.g. :RM main-function would jump the cursor back to the same file and position where main-function was created

  • DeleteNamedMark: delete a named mark, e.g. :DeleteNamedMark main-function would remove main-function from the mark list.


From a programming perspective, the code defines one prototype object (lines 1–104), the three commands (lines 106–116), and a completion function for two of the commands (lines 118–121).

If I had to jack off to one part of this code, it would be the prototype object. It contains:

  • Seven class methods and two class variables which are used to maintain the list of named marks, including reading/writing to the filesystem.

  • Two instance methods for deleting and recalling marks.

  • Four instance variables specifying the position and name of the mark.


If I was actually going to turn this into a plugin, I would want to flesh it out a bit and add, for example, better error handling and a command similar to the existing :marks command to list named marks.

Wednesday, September 3, 2008

Vim pr0n: Implementing prototype based objects

When vim 7 came along with support for lists (arrays) and dictionaries (hashes), nerds were delirious with joy. On the day it was released, geeks everywhere ripped off their pants and cartwheeled up and down their office aisles, their junk flapping freely in the air con. It was a great day to be alive.

It was also a great day to be blind.

One of the cool things about having dictionaries is that we can now implement prototype based OO. I've been playing around with this in vim script for a while now. If you are interested in doing any sort of OO programming with vim script then read this raving.

"Prototype Based OO" wtf yo?!


There are two types of object oriented programming: class based OO and prototype based OO.

In class based OO (e.g. java, c++, ruby etc) you write the blueprints for your objects then use those blueprints to create working object instances.

In prototype based OO (e.g. javascript, lua), you create a fully functional working object (i.e. a "prototype") and then clone that object. So the prototype object effectively serves as the class, while the clones of that prototype serve as the instances.

Getting started — methods, properties and constructors


In vim script the prototype object is defined as a dictionary, where the dictionary keys map to values (properties) and function references (methods).

Check this example out:


 1 "start the prototype
 2 let AK47 = {}
 3
 4 "the constructor
 5 function! AK47.New(ammo)
 6     let newAK47 = copy(self)
 7     let newAK47.ammo = a:ammo
 8     return newAK47
 9 endfunction
10
11 "an instance method
12 function! AK47.fire()
13     if self.ammo > 0
14         echo "BANG!"
15         let self.ammo -= 1
16     else
17         echo "click"
18     endif
19 endfunction
20
21 "at runtime we can do this:
22 let a = AK47.New(2)
23 echo a.ammo   " => 2
24 call a.fire() " => BANG!
25 call a.fire() " => BANG!
26 call a.fire() " => click


In this example, our prototype starts as an empty dictionary.

The first thing we add to the prototype is a constructor. There are a few ways you could do this, but I like to do it with a method called New(). It clones the prototype object (i.e. self), assigns the ammo instance property and returns the new object.

Next we add an instance method called fire() which "shoots" a bullet if there's any ammo left.

Notice that self is a reference to the current object. It is mandatory to use this reference when accessing members of the current object. In the above example, if self.ammo > 0 succeeds, whereas if ammo > 0 would result in an Undefined variable error.

Private methods and properties


There is no way to make methods or properties private. However, if you make up some conventions for yourself, then you can make the intent of your code clear (even though vim wont actually enforce it). I have the convention that any method or property starting with an underscore should be treated as private.


So, for example, I could make the ammo instance property "private" like this:


 1 "start the prototype
 2 let AK47 = {}
 3
 4 "the constructor
 5 function! AK47.New(ammo)
 6     let newAK47 = copy(self)
 7     let newAK47._ammo = a:ammo
 8     return newAK47
 9 endfunction
10
11 "an instance method
12 function! AK47.fire()
13     if self._ammo > 0
14         echo "BANG!"
15         let self._ammo -= 1
16     else
17         echo "click"
18     endif
19 endfunction


Class methods and class properties


Officially in vim script, there are no such things as class methods or class variables, but you can still implement them.

If a method doesn't access any instance variables or instance methods then, practically speaking, it's a class method. The New() methods above are examples.

If a variable is defined and accessed on the prototype object, then its a class variable.

I have some conventions I've been using:

  • I like to start all class members with a capital letter and all instance members with a lower case letter.

  • If I'm calling a class method from inside an instance method then I like to use the prototype name as the target object, i.e. TheClass.TheClassMethod() rather than self.TheClassMethod(). Similarly for class variables.


Inheritance


Prototyping with Vim script is an example of "Pure prototyping", or "Concatenative prototyping". Each object stands alone and has no links to its parent prototype. If you want to create a subclass, you must clone the parent prototype then add the new features to the clone. You can see why it's called called "Concatenative", since all the prototypes are joined together as you go down the inheritance tree.

This is in contrast to, say, javascript where, instead of cloning the parent, every object has a magic prototype property which points to the parent. The interpreter then uses this link for method dispatching, i.e. it searches back up the inheritance tree for the method definition.

Anyway, let's look at an example:


 1 "clone the AK47 prototype
 2 let AK47GL = copy(AK47)
 3
 4 "override the old constructor
 5 function! AK47GL.New(ammo, grenades)
 6     let newAK47GL = copy(self)
 7     let newAK47GL.ammo = a:ammo
 8     let newAK47GL.grenades = a:grenades
 9     return newAK47GL
10 endfunction
11
12 "define a new instance method
13 function! AK47GL.fireGL()
14     if self.grenades > 0
15         echo "OMG BOOOOOM!"
16         let self.grenades -= 1
17     else
18         echo "click"
19     endif
20 endfunction
21
22 "at runtime we can do this:
23 let a = AK47GL.New(2,1)
24 echo a.ammo     " => 2
25 echo a.grenades " => 1
26 call a.fire()   " => BANG!
27 call a.fire()   " => BANG!
28 call a.fire()   " => click
29 call a.fireGL() " => OMG BOOOOOM!
30 call a.fireGL() " => click


Here we define a new type of AK47 called AK47GL (an AK with an under-slung grenade launcher).

First we clone the AK47 prototype.

Then we replace the New method with one that accepts a grenade ammo counter. This is how we override methods. If we were really hardcore, we could rename the old New() method to something like _AK47_New() so that it will still be available to us, but I haven't bothered here.

Lastly, we define a new method called fireGL().

One thing to note about inheritance is that the subclass must be defined after the superclass in the code. Otherwise the initial copy() will fail.

Final ranting


We've seen that, using dictionaries we can create prototype objects with methods and properties. We can implement class methods and class variables. We can't implement private or protected members, but we can at least indicate our intentions with naming conventions. We've also seen how to implement inheritance.

I realise that there's a lot of stuff that I've left out, and if you need to know something I haven't covered here then the best source of information is other prototyping languages. Take a look at how people do it with javascript (the prototype library could be useful) or lua. Also, there's a whole list of prototype based OO languages here that you can steal ideas from.

Saturday, August 30, 2008

Vim pr0n: Making statuslines that own

Many of vim's default options smoke boner hard enough to turn a man inside out. One such option is 'statusline'. By default this option is blank, causing the statusline to display only the tail of the filename for the current buffer. Most people like much more detailed information to be displayed. For example, check out my current statusline:


set statusline=%t[%{strlen(&fenc)?&fenc:'none'},%{&ff}]%h%m%r%y%=%c,%l/%L\ %P


If you don't have a statusline that owns, then read this raving right now.

Commented form


Before we get into actually putting information on your statusline, another way to express your statusline is like this:

 1 set statusline=%t       "tail of the filename
 2 set statusline+=[%{strlen(&fenc)?&fenc:'none'}, "file encoding
 3 set statusline+=%{&ff}] "file format
 4 set statusline+=%h      "help file flag
 5 set statusline+=%m      "modified flag
 6 set statusline+=%r      "read only flag
 7 set statusline+=%y      "filetype
 8 set statusline+=%=      "left/right separator
 9 set statusline+=%c,     "cursor column
10 set statusline+=%l/%L   "cursor line/total lines
11 set statusline+=\ %P    "percent through file


This format is way more useful if you are experimenting with all the statusline flags etc to find a good setting. You may want to use it all the time anyway as it is more readable and maintainable.

Statusline flags


The easiest way to put information on your statusline is with the built in flags. For example, %m displays a [+] if the current buffer is modified, while %F displays the full path to the current file. A full list of these flags can be found at :help 'statusline, there's tons of them so be sure to have a good read through.

Using expressions and functions calls


You are not restricted to using just these flags though. You can put anything you want on your statusline! Any expression enclosed by %{...} will be evaluated and displayed. For example: %{strlen(&ft)?&ft:'ZOMG'} will display the current filetype or "ZOMG" if none is set.

If you want to display something that requires any complex logic, you can extract it out into a function. For example:

 1 set statusline=......%{FileSize()}.....
 2 function! FileSize()
 3     let bytes = getfsize(expand("%:p"))
 4     if bytes <= 0
 5         return ""
 6     endif
 7     if bytes < 1024
 8         return bytes
 9     else
10         return (bytes / 1024) . "K"
11     endif
12 endfunction


In this example a function is used to display the size of the current file (in kilobytes if appropriate).

Controlling formatting and alignment


You can control the width and alignment of each item on the statusline as you specify it. The full syntax for specifying an item is:
%-0{minwid}.{maxwid}{item}

All of the parameters are optional except the {item} itself. A full description of the syntax is at :help 'statusline but basically:

  • The - forces the item to be left aligned, omitting it makes it right aligned.

  • The 0 forces numeric values to be left padded with zeros.

  • Then we have some width arguments and the item itself.


Examples:
%-.100F — displays the full filename of the current buffer, left aligned, 100 characters max.

%03.b — displays the ascii value of the current byte, at least 3 characters wide and left padded with zeros.

%20.20{'tabstop='.&tabstop} — displays "tabstop=<current tabstop>" 20 characters wide, right aligned.

You can also group several items together and apply formatting to the group as a whole. To do this, use the %(...%) syntax. For example: %20(%l/%L%) would display <current-line>/<total-lines> at a minimum width of 20 characters.

One more thing I will mention about formatting is the magic %= flag. If this flag appears in your statusline then everything after it will be shoved to the right as far as possible.

Using colors


There are two general approaches you can take with color. It depends on your needs and how hardcore you are. One way allows you to control exactly what colors are used, while the other way lets you use existing highlight groups which are controlled by your colorscheme.

Using existing highlight groups is easy, just use %#foo# to switch colors to the foo highlight group. Use %* to switch back to using the statusline highlight group. For example:


1 set statusline=
2 set statusline+=%#todo#  "switch to todo highlight
3 set statusline+=%F       "full filename
4 set statusline+=%#error# "switch to error highlight
5 set statusline+=%y       "filetype
6 set statusline+=%*       "switch back to normal statusline highlight
7 set statusline+=%l       "line number


The two disadvantages to doing color this way is that you don't have direct control over which colors are used, and if you change colorschemes then all the colors on your statusline will change.

The second method requires you to define up to nine highlight groups called User1,User2..User9. Then, vim provides shortcuts for you to switch between these colors on the statusline. For example:

 1 "define 3 custom highlight groups
 2 hi User1 ctermbg=green ctermfg=red   guibg=green guifg=red
 3 hi User2 ctermbg=red   ctermfg=blue  guibg=red   guifg=blue
 4 hi User3 ctermbg=blue  ctermfg=green guibg=blue  guifg=green
 5
 6 set statusline=
 7 set statusline+=%1*  "switch to User1 highlight
 8 set statusline+=%F   "full filename
 9 set statusline+=%2*  "switch to User2 highlight
10 set statusline+=%y   "filetype
11 set statusline+=%3*  "switch to User3 highlight
12 set statusline+=%l   "line number
13 set statusline+=%*   "switch back to statusline highlight
14 set statusline+=%P   "percentage thru file


Note that you must define your custom highlight groups after any :colorscheme in your vimrc otherwise your highlight groups will be cleared when :colorscheme is called.

OMG the big gotcha


Remember, any spaces is your statusline must be escaped, this includes any strings resulting from a function call as well. If you get any strange error messages when setting your statusline, check for spaces.

Some examples


While writing this raving I journeyed into the nerdfest that is #vim on freenode and asked (harassed) people there to give me their statusline settings.

I got some responses from some pretty high powered geeks. Take a look though these examples and steal bits and pieces. If you want to try one out, be sure to strip out any non-standard function calls as well as color settings.

 1 " spiiph's
 2 set statusline=
 3 set statusline+=%<\                       " cut at start
 4 set statusline+=%2*[%n%H%M%R%W]%*\        " flags and buf no
 5 set statusline+=%-40f\                    " path
 6 set statusline+=%=%1*%y%*%*\              " file type
 7 set statusline+=%10((%l,%c)%)\            " line and column
 8 set statusline+=%P                        " percentage of file
 9
10
11 " jamessan's
12 set statusline=   " clear the statusline for when vimrc is reloaded
13 set statusline+=%-3.3n\                      " buffer number
14 set statusline+=%f\                          " file name
15 set statusline+=%h%m%r%w                     " flags
16 set statusline+=[%{strlen(&ft)?&ft:'none'},  " filetype
17 set statusline+=%{strlen(&fenc)?&fenc:&enc}, " encoding
18 set statusline+=%{&fileformat}]              " file format
19 set statusline+=%=                           " right align
20 set statusline+=%{synIDattr(synID(line('.'),col('.'),1),'name')}\  " highlight
21 set statusline+=%b,0x%-8B\                   " current char
22 set statusline+=%-14.(%l,%c%V%)\ %<%P        " offset
23
24
25 " tpope's
26 set statusline=[%n]\ %<%.99f\ %h%w%m%r%{exists('*CapsLockStatusline')?CapsLockStatusline():''}%y%=%-16(\ %l,%c-%v\ %)%P
27
28
29 " frogonwheels'
30 set statusline=%f%w%m%h%1*%r%2*%{VarExists('b:devpath','<Rel>')}%3*%{VarExists('b:relpath','<Dev>')}%{XLockStat()}%=%-15(%l,%c%V%)%P
31
32
33 " godlygeek's
34 let &statusline='%<%f%{&mod?"[+]":""}%r%{&fenc !~ "^$\\|utf-8" || &bomb ? "[".&fenc.(&bomb?"-bom":"")."]" : ""}%=%15.(%l,%c%V %P%)'
35
36
37 " Another way to write godlygeeks:
38 set statusline=%<%f%m%r%{Fenc()}%=%15.(%l,%c%V\ %P%)
39 function! Fenc()
40     if &fenc !~ "^$\|utf-8" || &bomb
41         return "[" . &fenc . (&bomb ? "-bom" : "" ) . "]"
42     else
43         return ""
44     endif
45 endfunction